[데이터엔지니어] 실리콘 밸리에서 날아온 엔지니어링 스타터 키트 Week4
4주차 주요내용
- 멱등성과 트랜잭션
- Airflow 이해하기
- NameGender.py DAG 개선하기
- Yahoo Finance API DAG 작성

멱등성과 트랜잭션
멱등성이란?
- 데이터 파이프라인이 연속 식행되었을 때 소스에 있는 데이터가 그대로 저장되어야 함을 이야기함
- 가령 Full refresh를 하는 데이터 파이프라인이라면…
- 먼저 DW의 관련 테이블에서 모든 레코드들을 삭제한다.
- 데이터 소스에서 읽어온 데이터를 DW테이블로 적재한다.
- 만일 1이 성공하고 2가 실패한다면…?
- 만일 1이 실행된 다음 누군가 이 테이블을 사용한다면?

→ 위와 같은 상황을 방지하기 위해, 우리는 트랜잭션에 대한 개념을 인지해야한다.
트랜잭션이란?
- Atomic하게 실행되어야 하는 SQL들을 묶어서 하나의 작업처럼 처리하는 방법
- Transaction Isolation Level: “Read Committed”가 디폴트 세팅
- Begin - END 또는 Begin - Commit 사이에 해당 SQL들을 사용한다.
- Python의 경우 try/catch와 같이 사용하는 것이 일반적이다.
- raise를 써주는 것이 좋다.
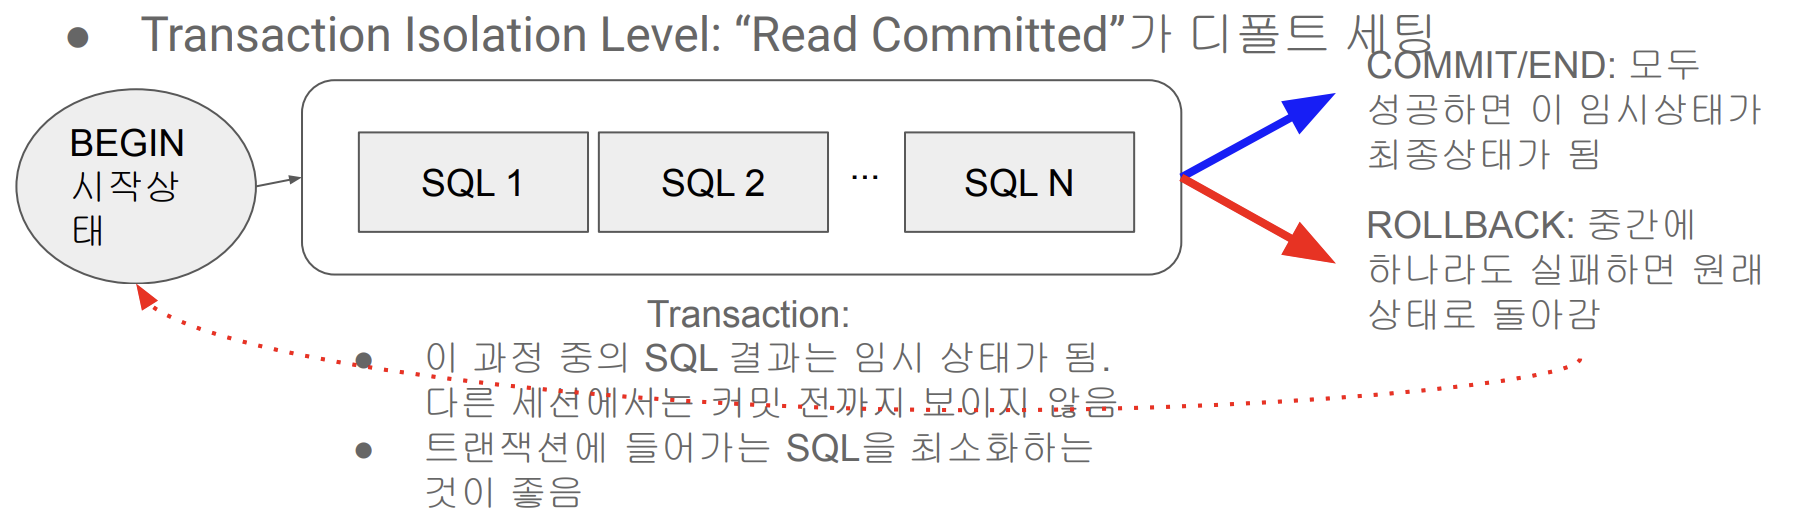
- Autocommit이 ‘True’ 일때 자동으로 commit 되는것을 막고싶으면 BEGIN 명시적으로 써주면 됨
- 무엇을 사용할지는 개인 취향이고, python의 경우 try/catch 문과 같이 사용하는 것이 일반적이다.
- try/catch로 에러가 나면 rollback을 명시적으로 실행, 에러가 안나면 commit 한다.
Airflow 이해하기
airflow에서는 데이터 파이프라인을 dag라고 부르며, dag는 다수의 task로 구성되고, task간에 실행순서가 지정되며 하나의 task는 여러개의 operator으로 구성된다.
- PythonOperator을 사용해서 task에서 해야하는 일을 python함수로 구현하는 것이다.
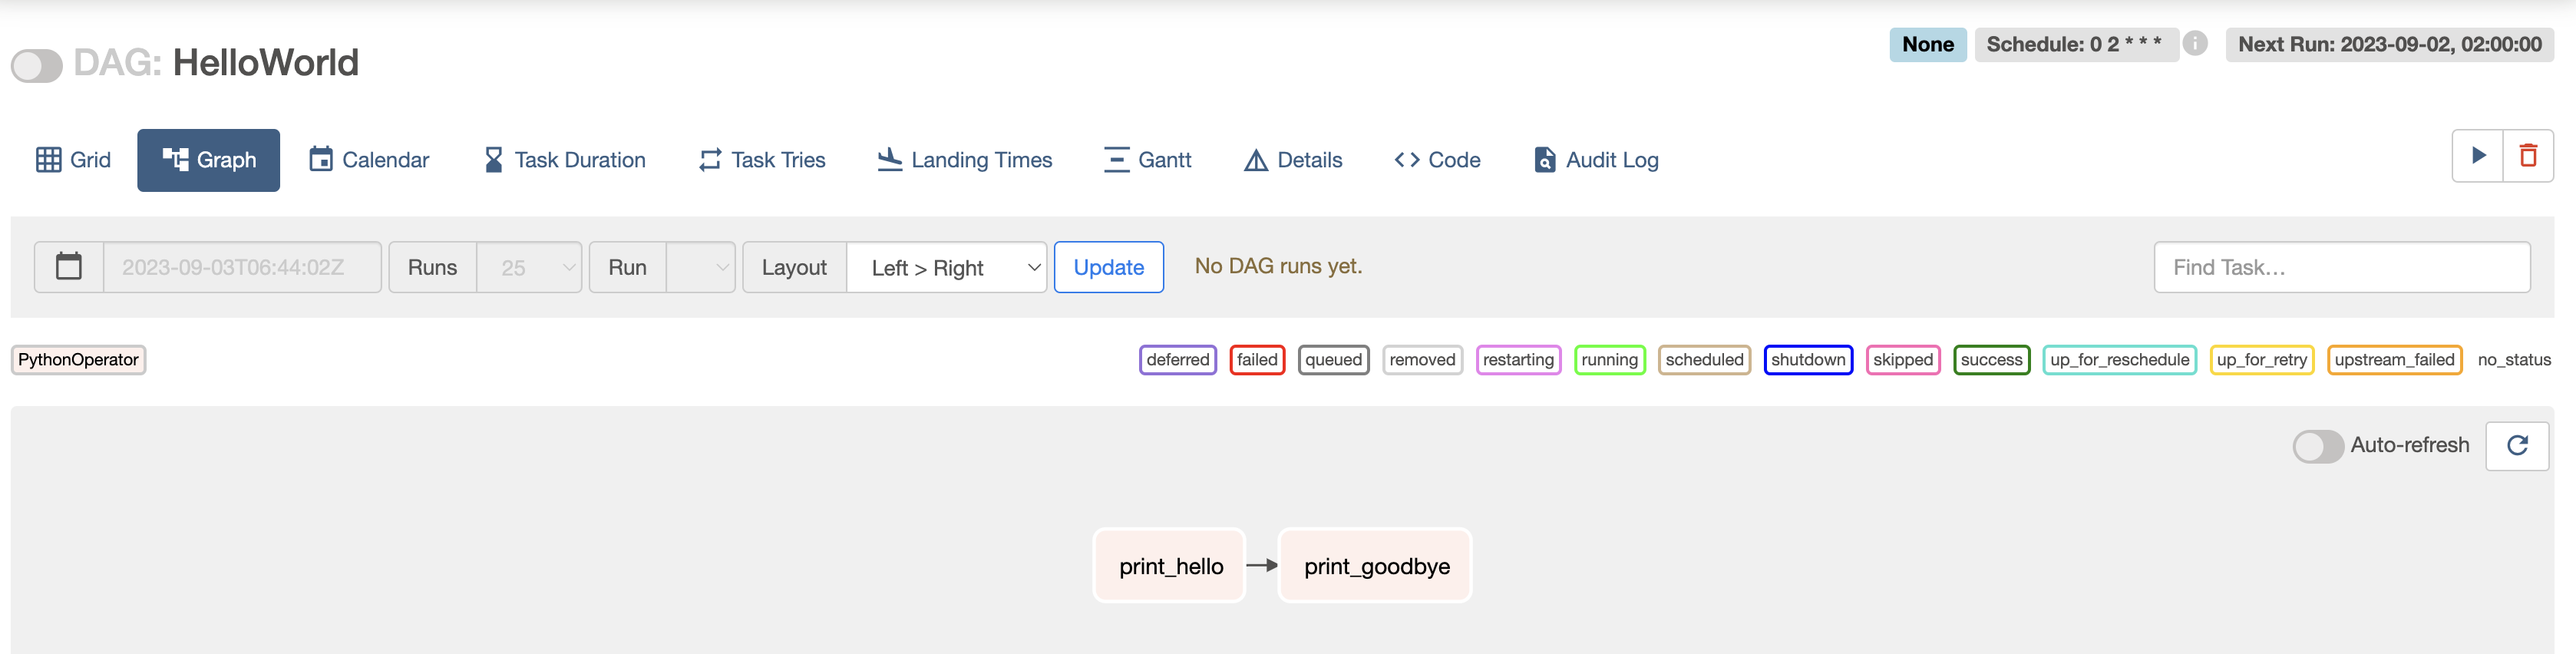
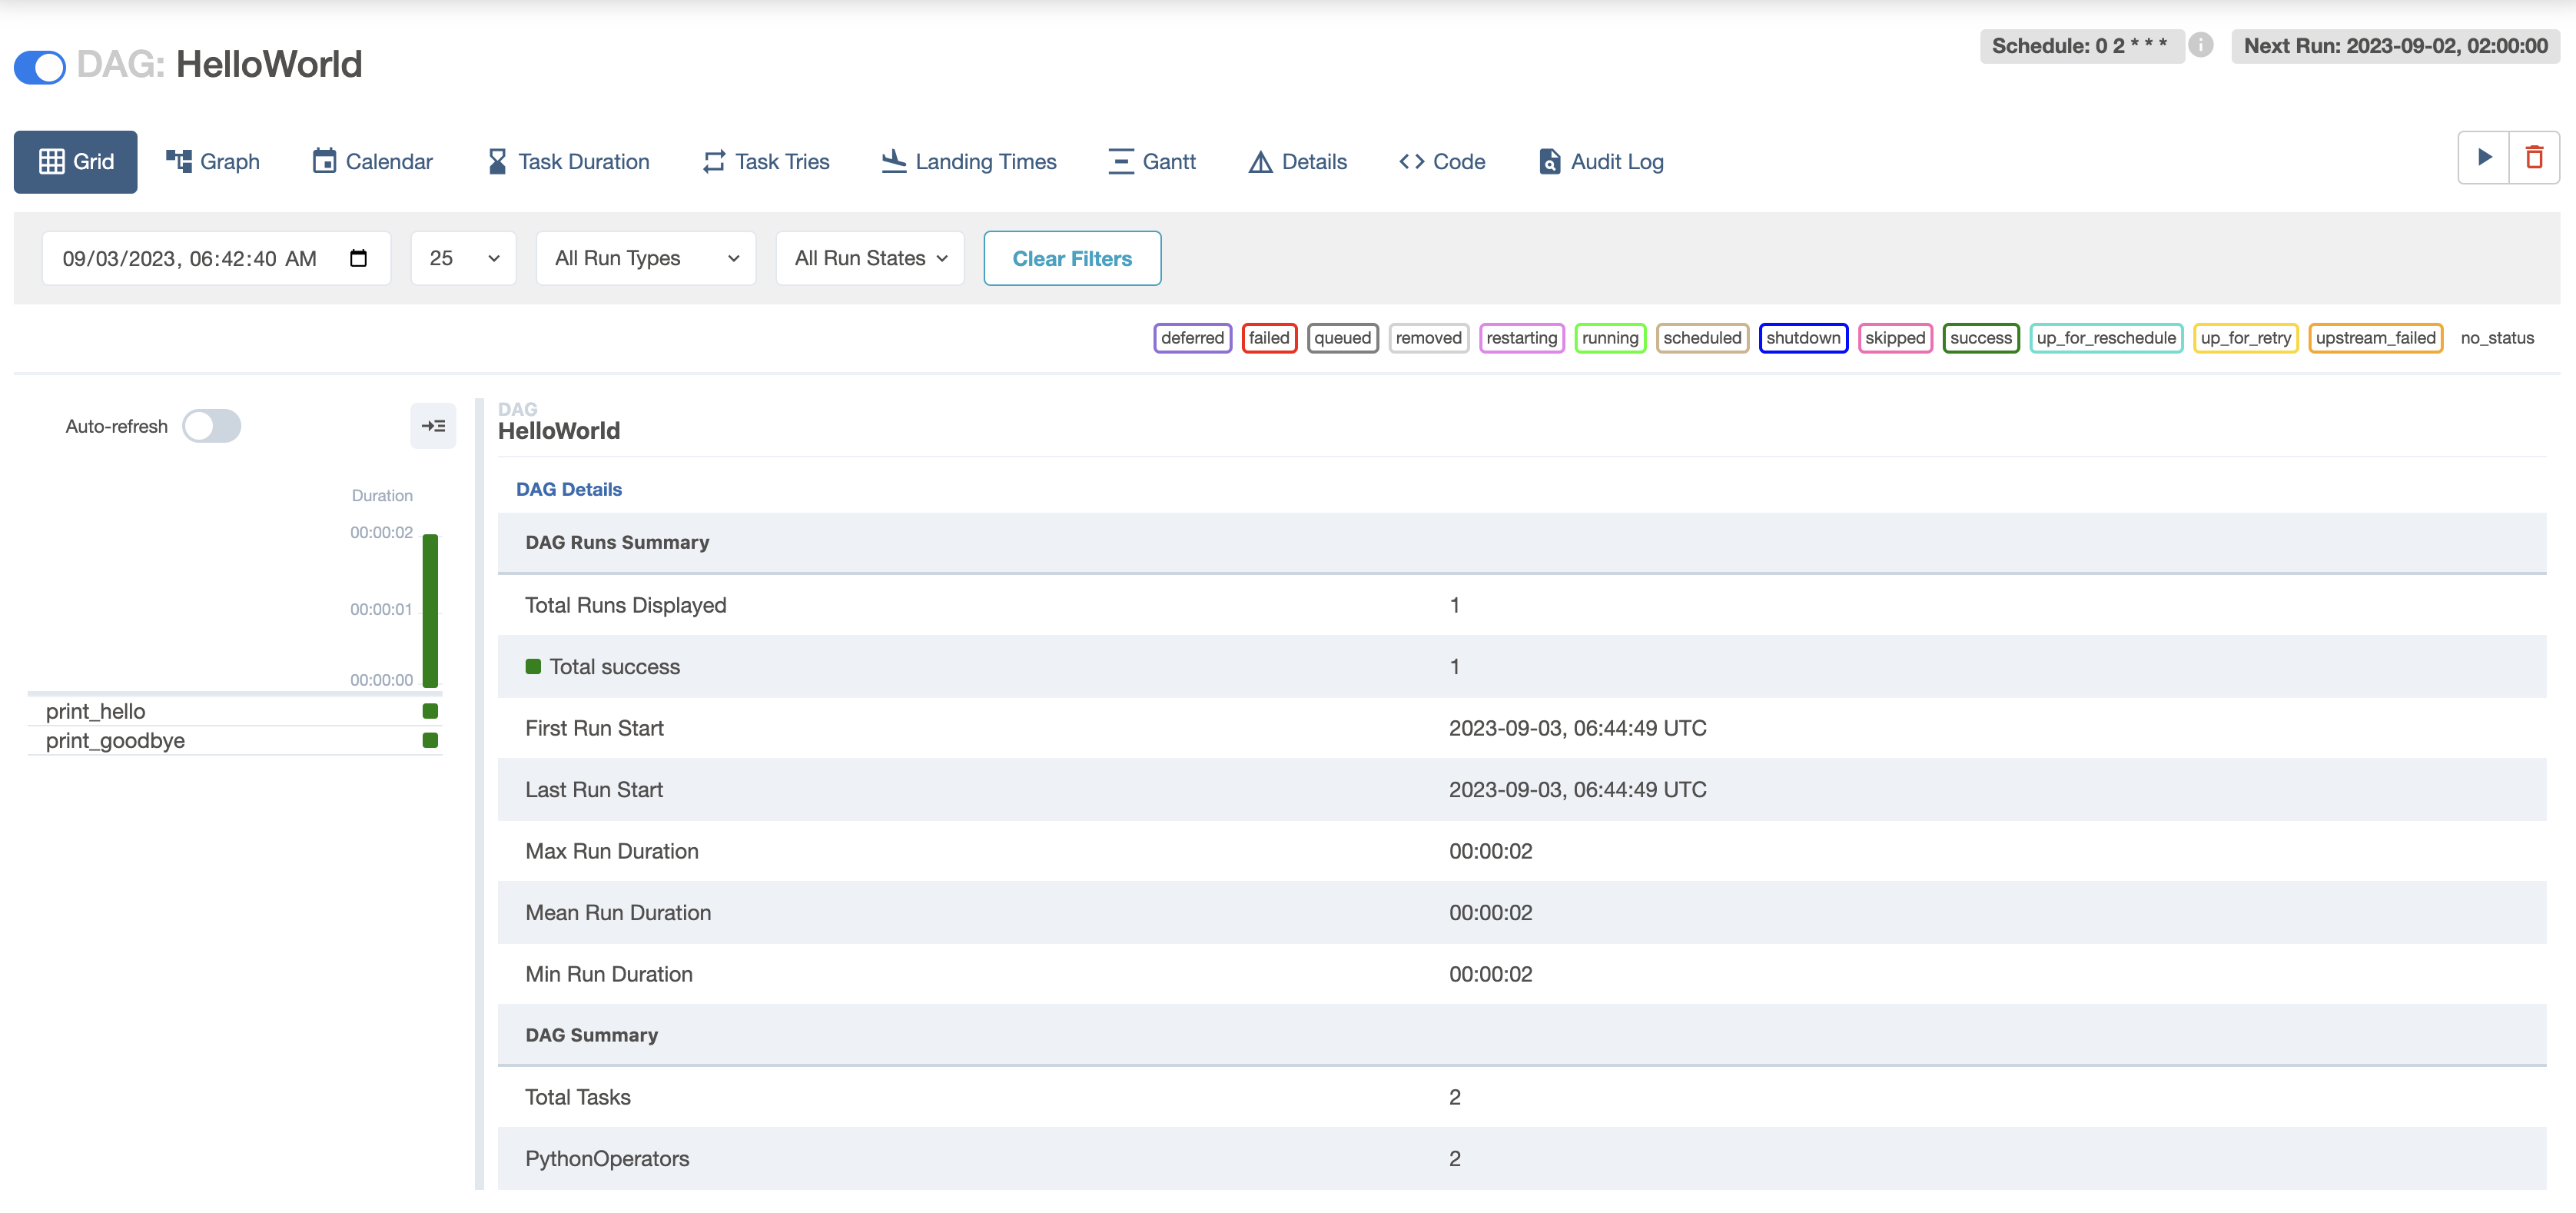
Hello World 예제 프로그램 살펴보기
from airflow import DAG
from airflow.operators.py thon import PythonOperator
from datetime import datetime
dag = DAG(
dag_id = 'HelloWorld',
start_date = datetime(2023,8,20),
catchup=False,
tags=['example'],
schedule = '0 2 * * *' # 하루에 한번 UTC: 2시 0분에 실행되는 것을 이야기함
)
def print_hello():
print("hello!")
return "hello!"
def print_goodbye():
print("goodbye!")
return "goodbye!"
print_hello = PythonOperator(
task_id = 'print_hello',
#python_callable param points to the function you want to run
python_callable = print_hello,
#dag param points to the DAG that this task is a part of
dag = dag)
print_goodbye = PythonOperator(
task_id = 'print_goodbye',
python_callable = print_goodbye,
dag = dag
)
#Assign the order of the tasks in our DAG
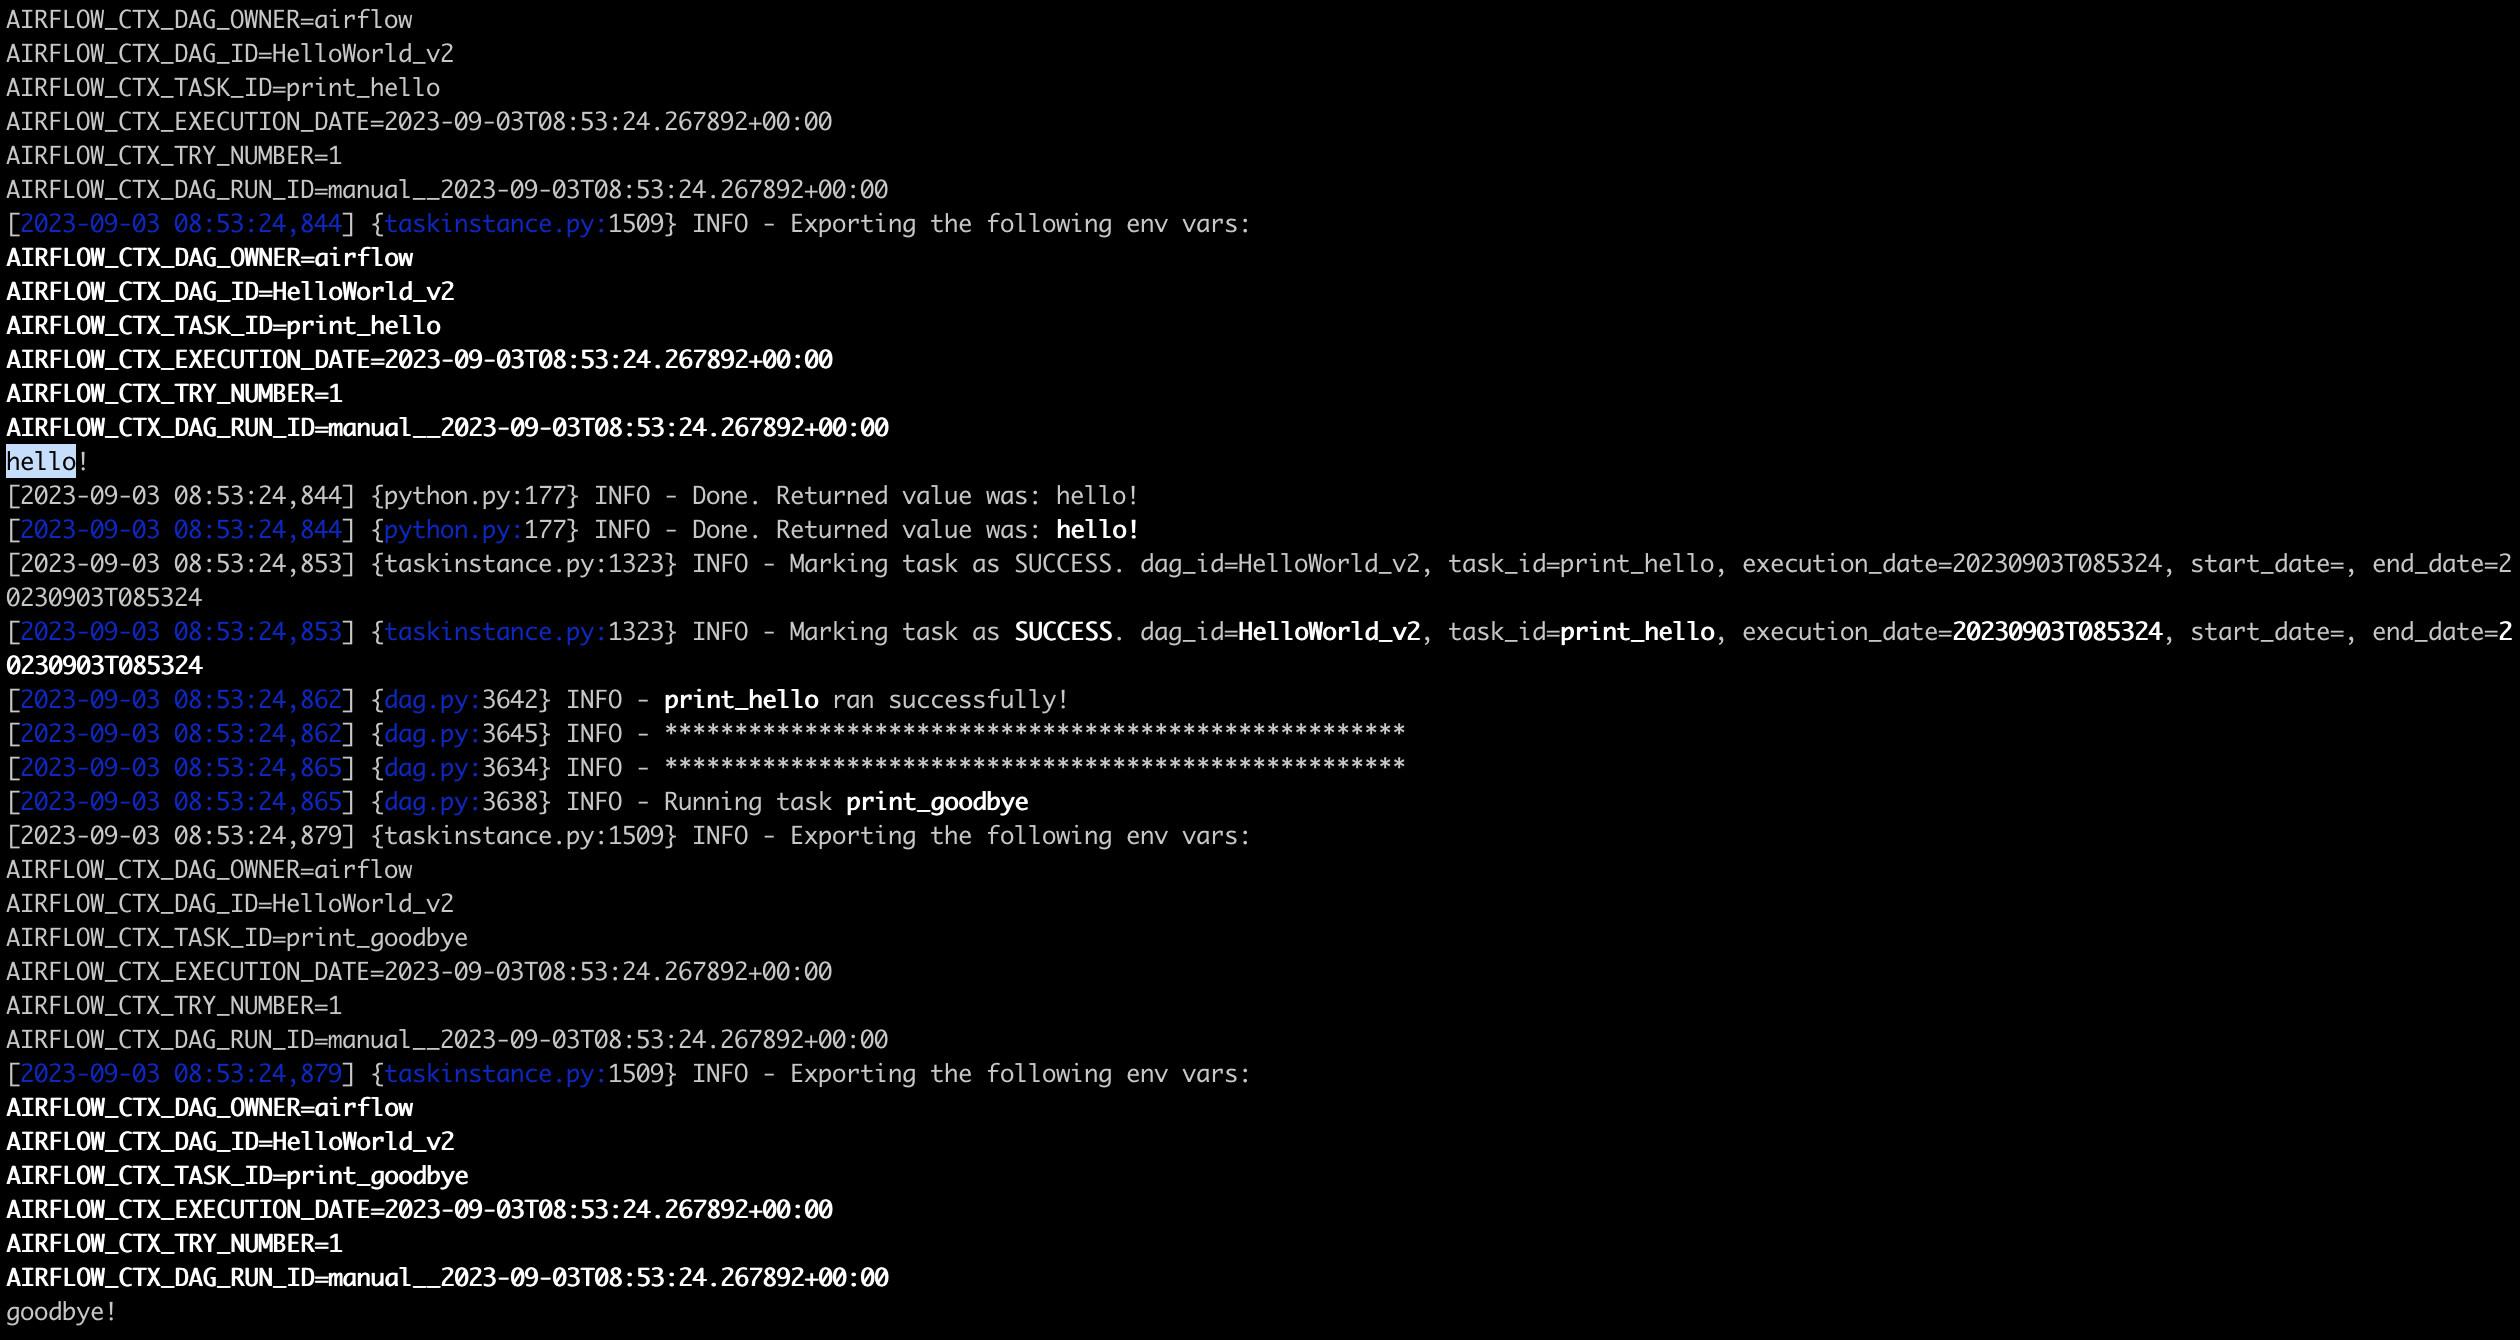
print_hello >> print_goodbye→ DAG로 설정해준 print_hello는 PythonOperator으로 구성되어있으며 먼저 실행하고 print_goodbye는 두번째로 실행한다.
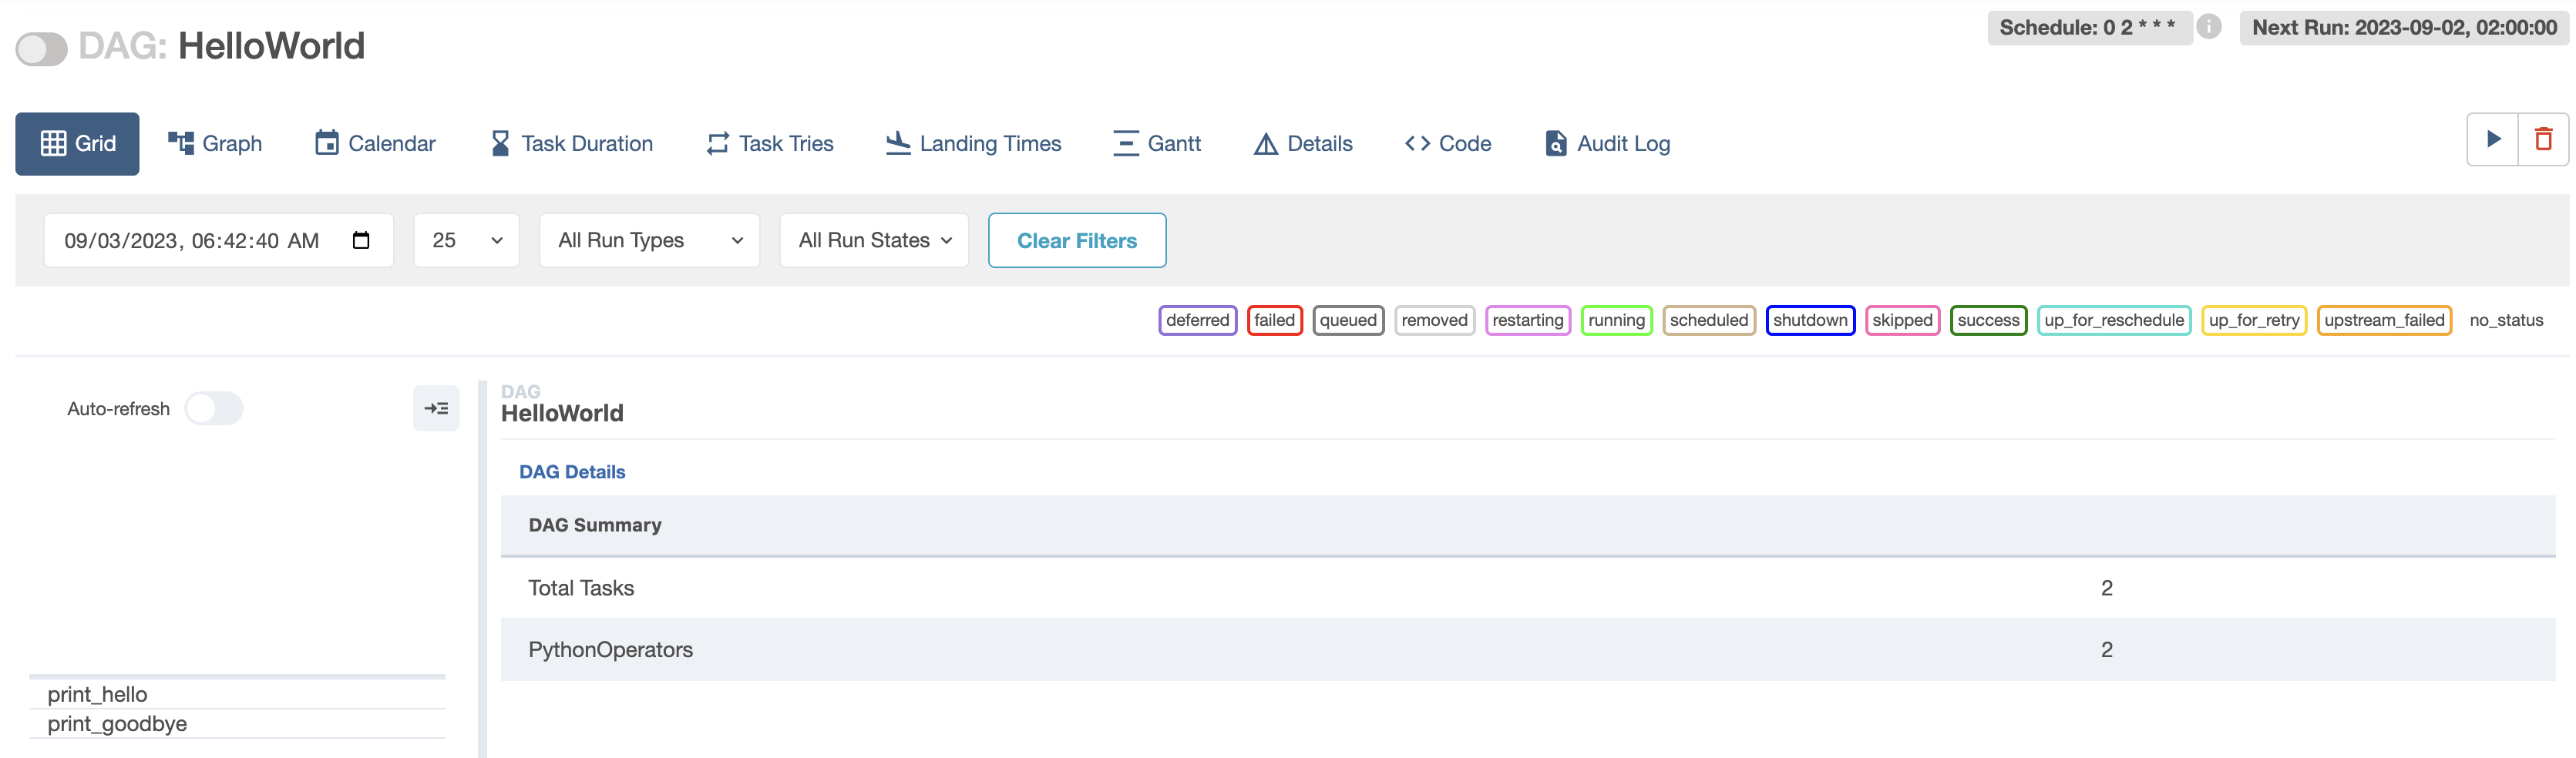
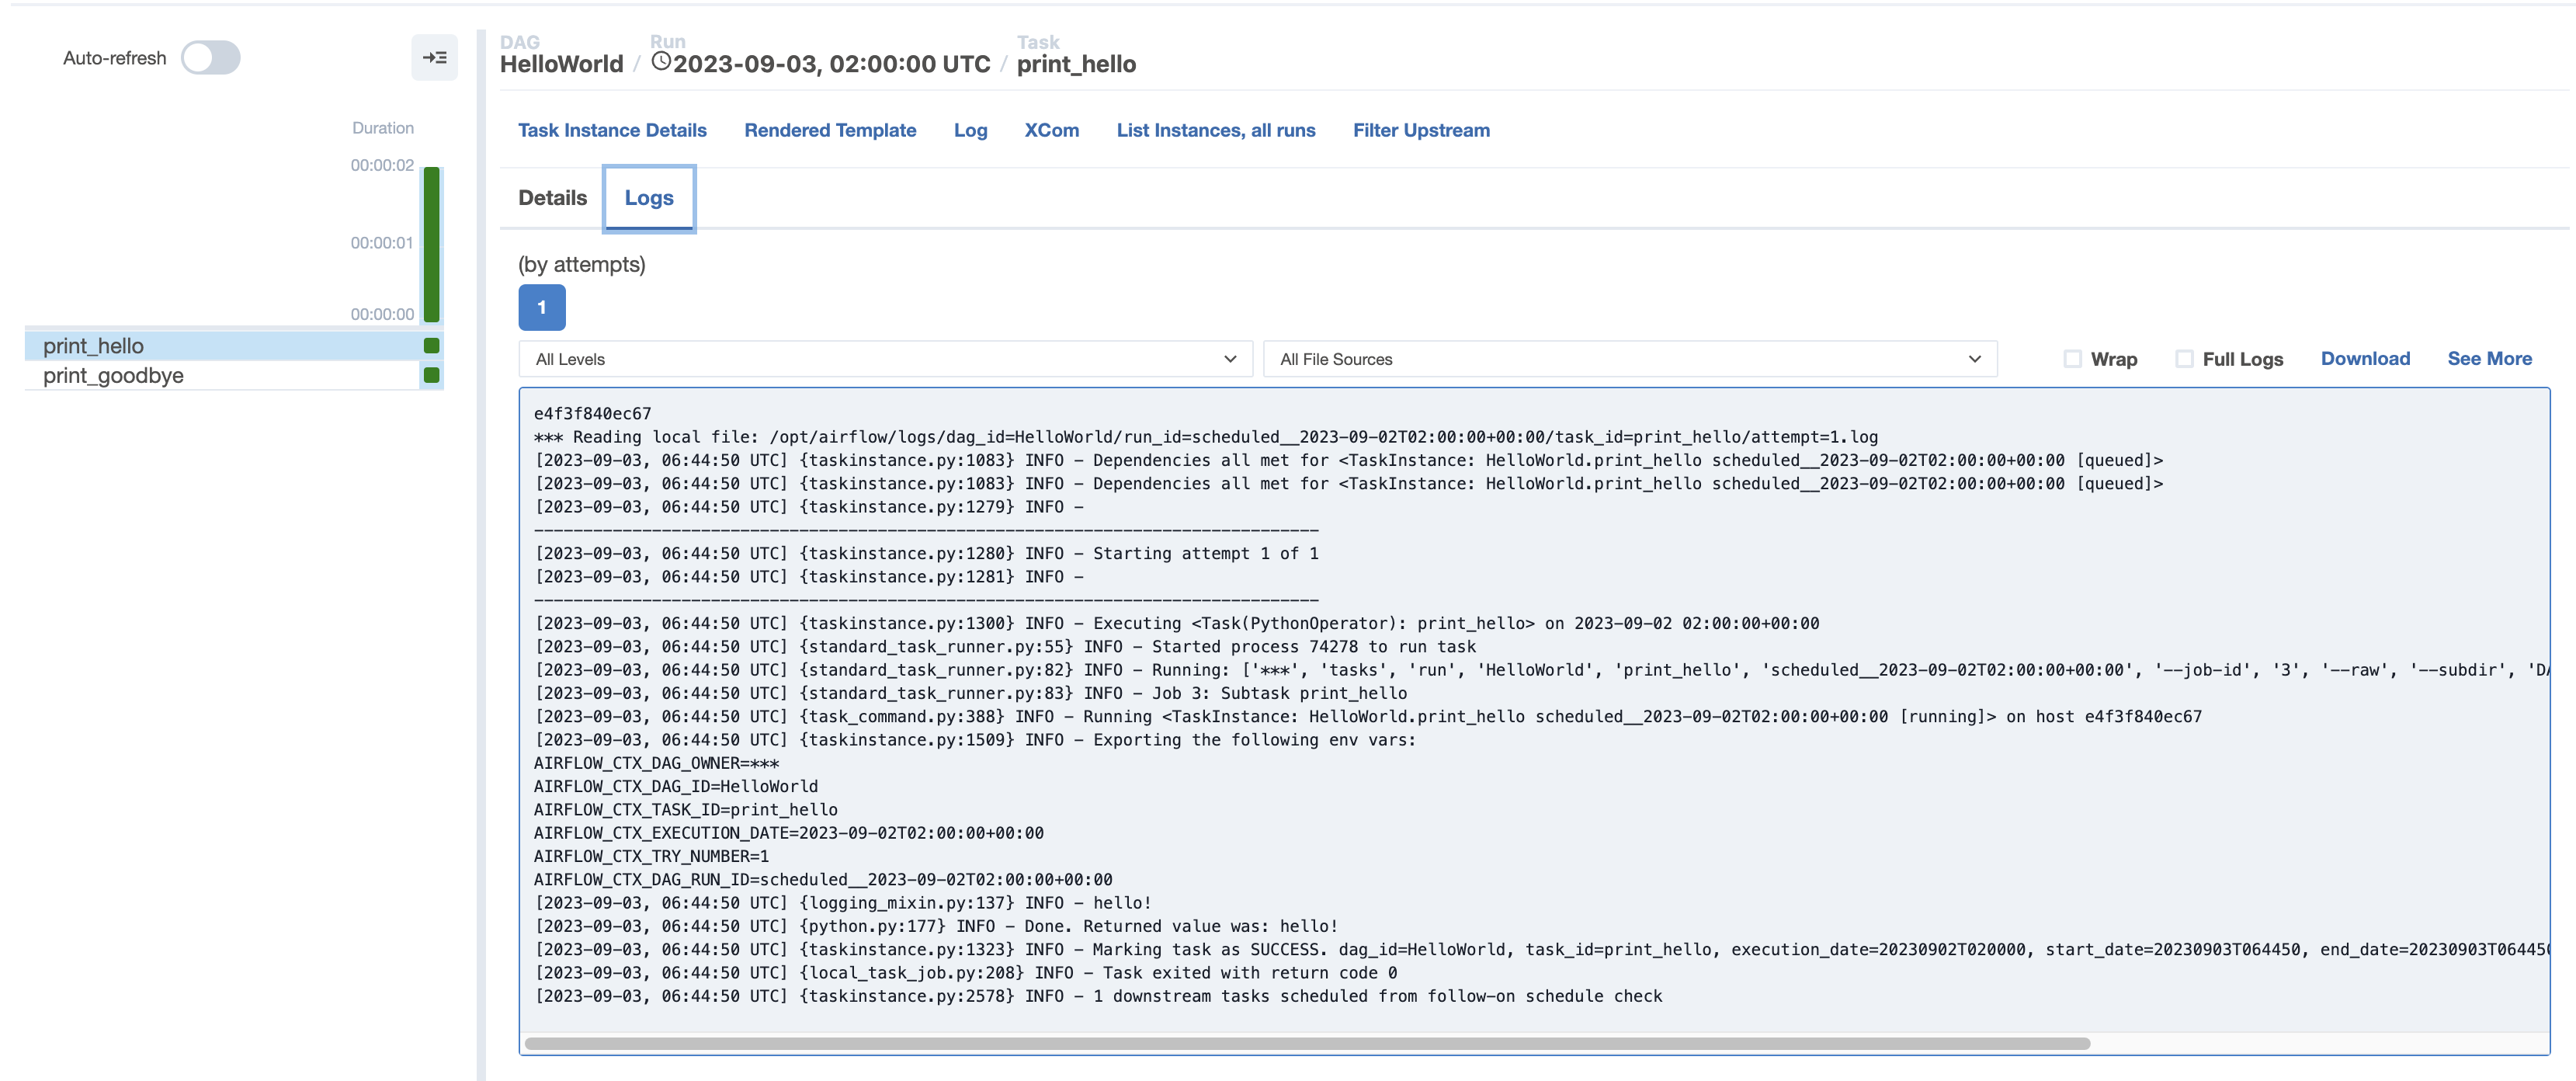
- def print_hello(): , def print_goodbye(): 에서 나온 결과값
- PythonOperator을 사용하면 파이썬으로 작성할 수 있는 모든 일을 dag의 task로 구현할 수 있다.
- 가장 강력하지만, 가장 노가다를 많이해야하는 오퍼레이터이다.
- 오퍼레이터를 본인이 직접 구현한다기 보다는, 누군가가 만든 오퍼레이터를 가지고 사용하는게 일반적임
- Airflow하면서 처음 배울때 가장 어려운 부분은 start_date, catchup, execution_date가 무엇이냐 하는것
- start_date는 보기와는 다르게 처음 시작하는 날이 아님 → 향후 설명
Task 파라미터
- 위에서 PythonOperator들을 따로 불러서 각각의 함수를 부르는것이 일반적인 방법이었다.
- 그러나 Decorator의 task를 사용해서 편리하게 처리할 수 있는 방법이 있다.
from airflow import DAG
from airflow.decorators import task
from datetime import datetime

@task
def print_hello():
    print("hello!")
    return "hello!"

@task
def print_goodbye():
    print("goodbye!")
    return "goodbye!"

with DAG(
    dag_id = 'HelloWorld_v2',
    start_date = datetime(2022,5,5), # 시작하는 날이 아님.. 헷갈리는 개념
    catchup=False,
    tags=['example'],
    schedule = '0 2 * * *'
		default_dags=default_dag # task param 이렇게 설정해주는게 일반적임
) as dag:

    # Assign the tasks to the DAG in order
print_hello() >> print_goodbye()- @task 로 처리된 부분은 함수이름이 id 그자체가 된다.
- PythonOperator 사용해도 되지만, 간편하다는 이유때문에 위와 같은 방식으로 사용되는게 일반적이다.
default_args = 모든 파라미터에 공통적으로 들어가는 인자처리
‘on_success_callback’ : if success call me
’on_failure_callback’ : if failure call me
중요한 DAG파라미터 (not task 파라미터)
- max_active_runs : #of DAGS instance (백필할 때 사용됨) (default=16, 안전하게 1로 세팅한다.)
- (이론적으로) 높은 수일 수록 한번에 dag 돌아가는 횟수가 정해지기 때문에 빠르게 처리할 수 있다.
- Cpu 갯수에 따라서 upper_bound 설정된다. cpu설정에 따라서 돌아갈 수 있는 dag의 최대가 정해진다.
- 크게 지정한다고 해서 좋은게 아닌게, 크게 지정할 수록 소스에 load가 가서 소스쪽에 문제가 생길 수 있다.
- 따라서, 소스와 destination에 capacity에 따라서 크게 설정해주는건 의미없고, 오히려 문제를 일으킬 수 있다.
- max_active_tasks : # of tasks that can run in parallel (동시에 여러 태스크 돌아가는 수)
- 하나의 DAG밑에서 task가 동시에 몇개가 돌 수 있는가를 의미한다. 일렬로 돌아가는 dag면 크게하나 작게하나 문제없음 동시에 여러개가 돌아가는 task라면 이 값을 어떻게 세팅해주는가는 중요해진다. Airflow 서버의 cpu 보다 크게 세팅하는건 의미없다.
- catchup: whether to backfill past runs → 나중에 설명함
- DAG Param vs. Task Param 차이점 이해가 중요하다.
- 위의 파라미터들은 모두 DAG파라미터로 DAG객체를 만들 때 지정해주어야 한다.
How to Trigger a DAG
- airflow 컨테이너 중 하나로 로그인
- docker ps : #Worker 의 컨테이너 ID 찾기
- docker exec -it 컨테이너ID sh

- docker : 컨테이너를 실행
- exec : 특정 docker container에게 명령어를 던진다.
- -it : interactive 하게 명령어를 주고받는 것을 의미한다.
- 컨테이너ID 에게 sh 라는 명령어를 수행해라 라는 뜻 ⇒ 해당 도커 컨테이너 안으로 로그인 하라는 뜻
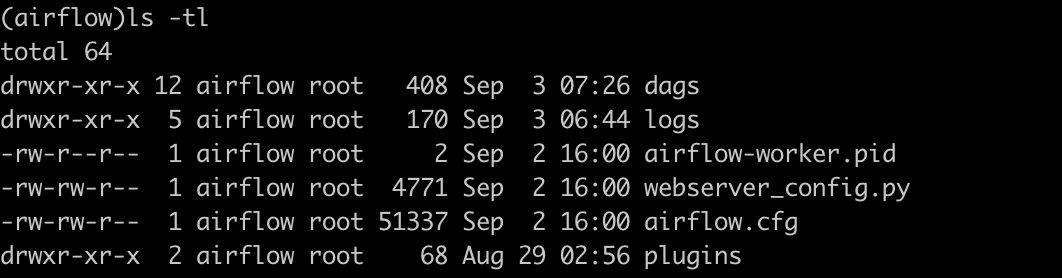
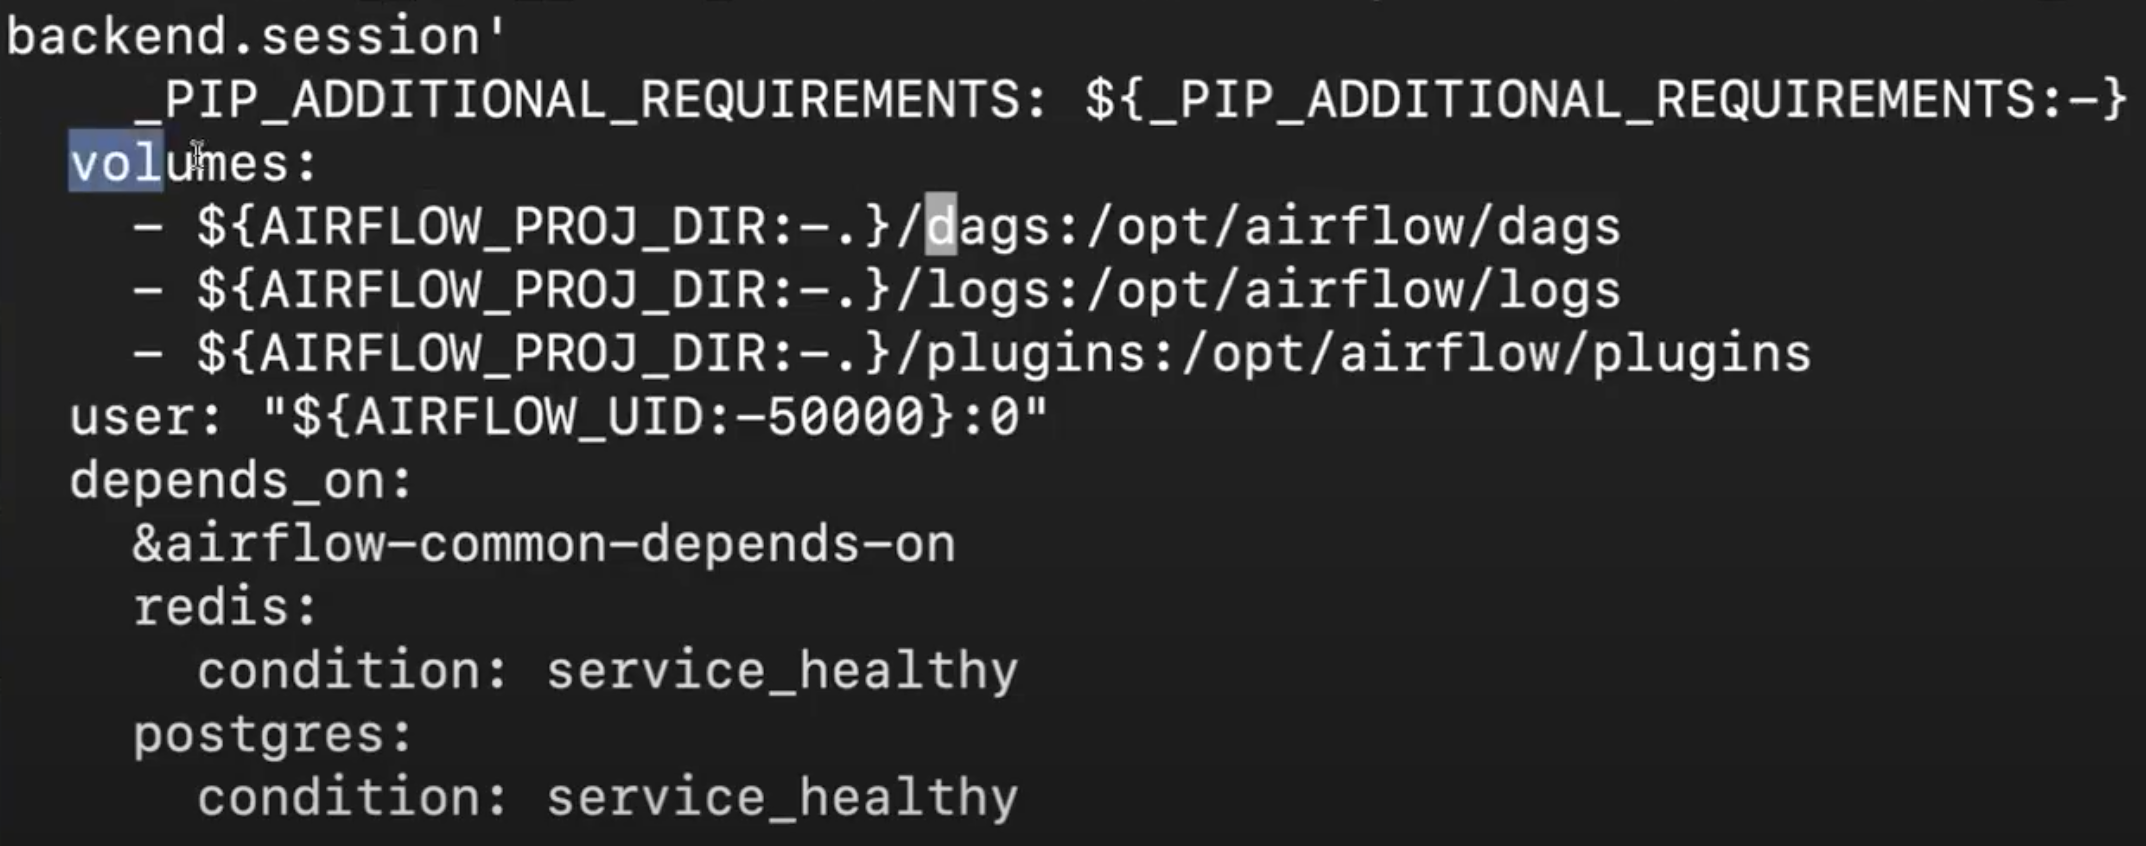
- airflow 내부에서 dags directory의 내용과 로컬 dags 저장소에 있는 내용이 서로 동일하다.
- 외부에 있는 같은 볼륨을 사용하기 때문에 파일안의 내용이 서로 같다.
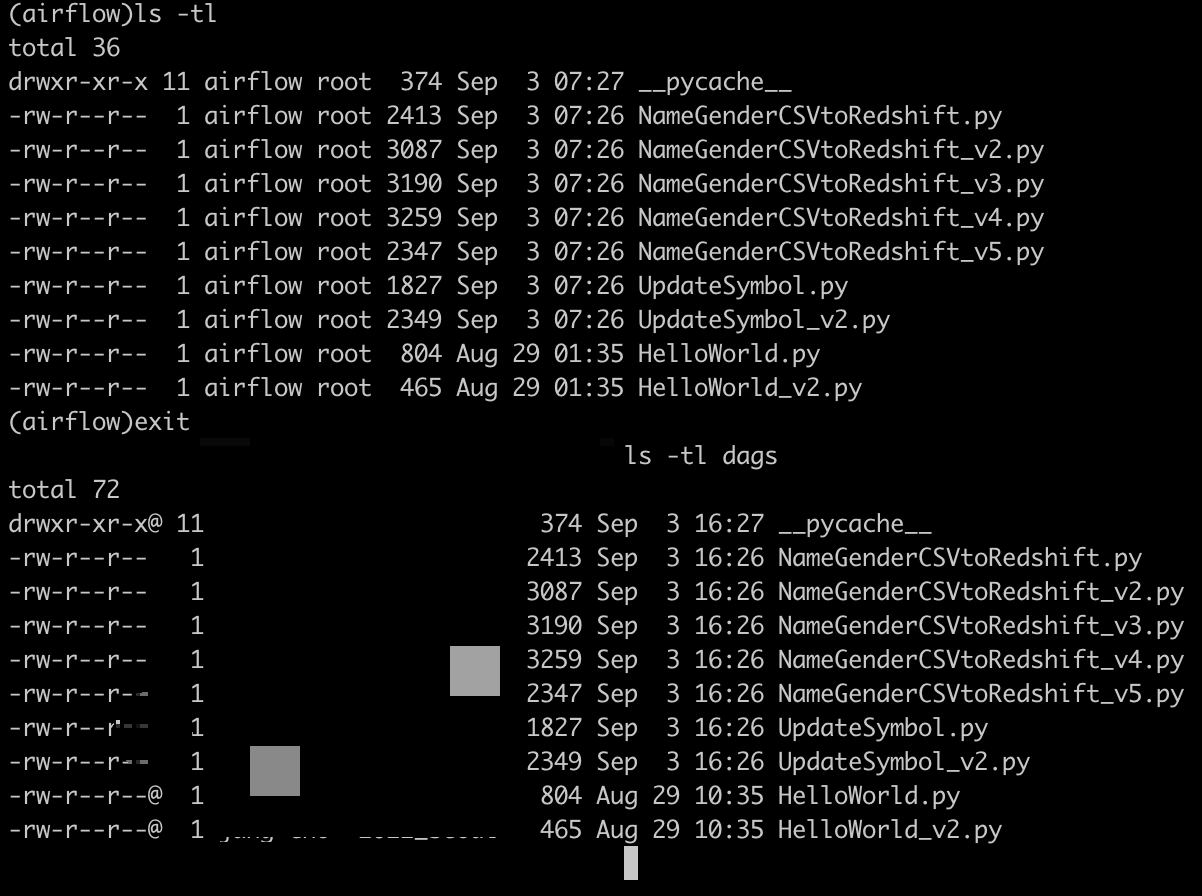
- 위와 같이 될 수 있었던 이유는 docker-compose.yaml 에서 volumes 설정을 해주었기 때문이다.
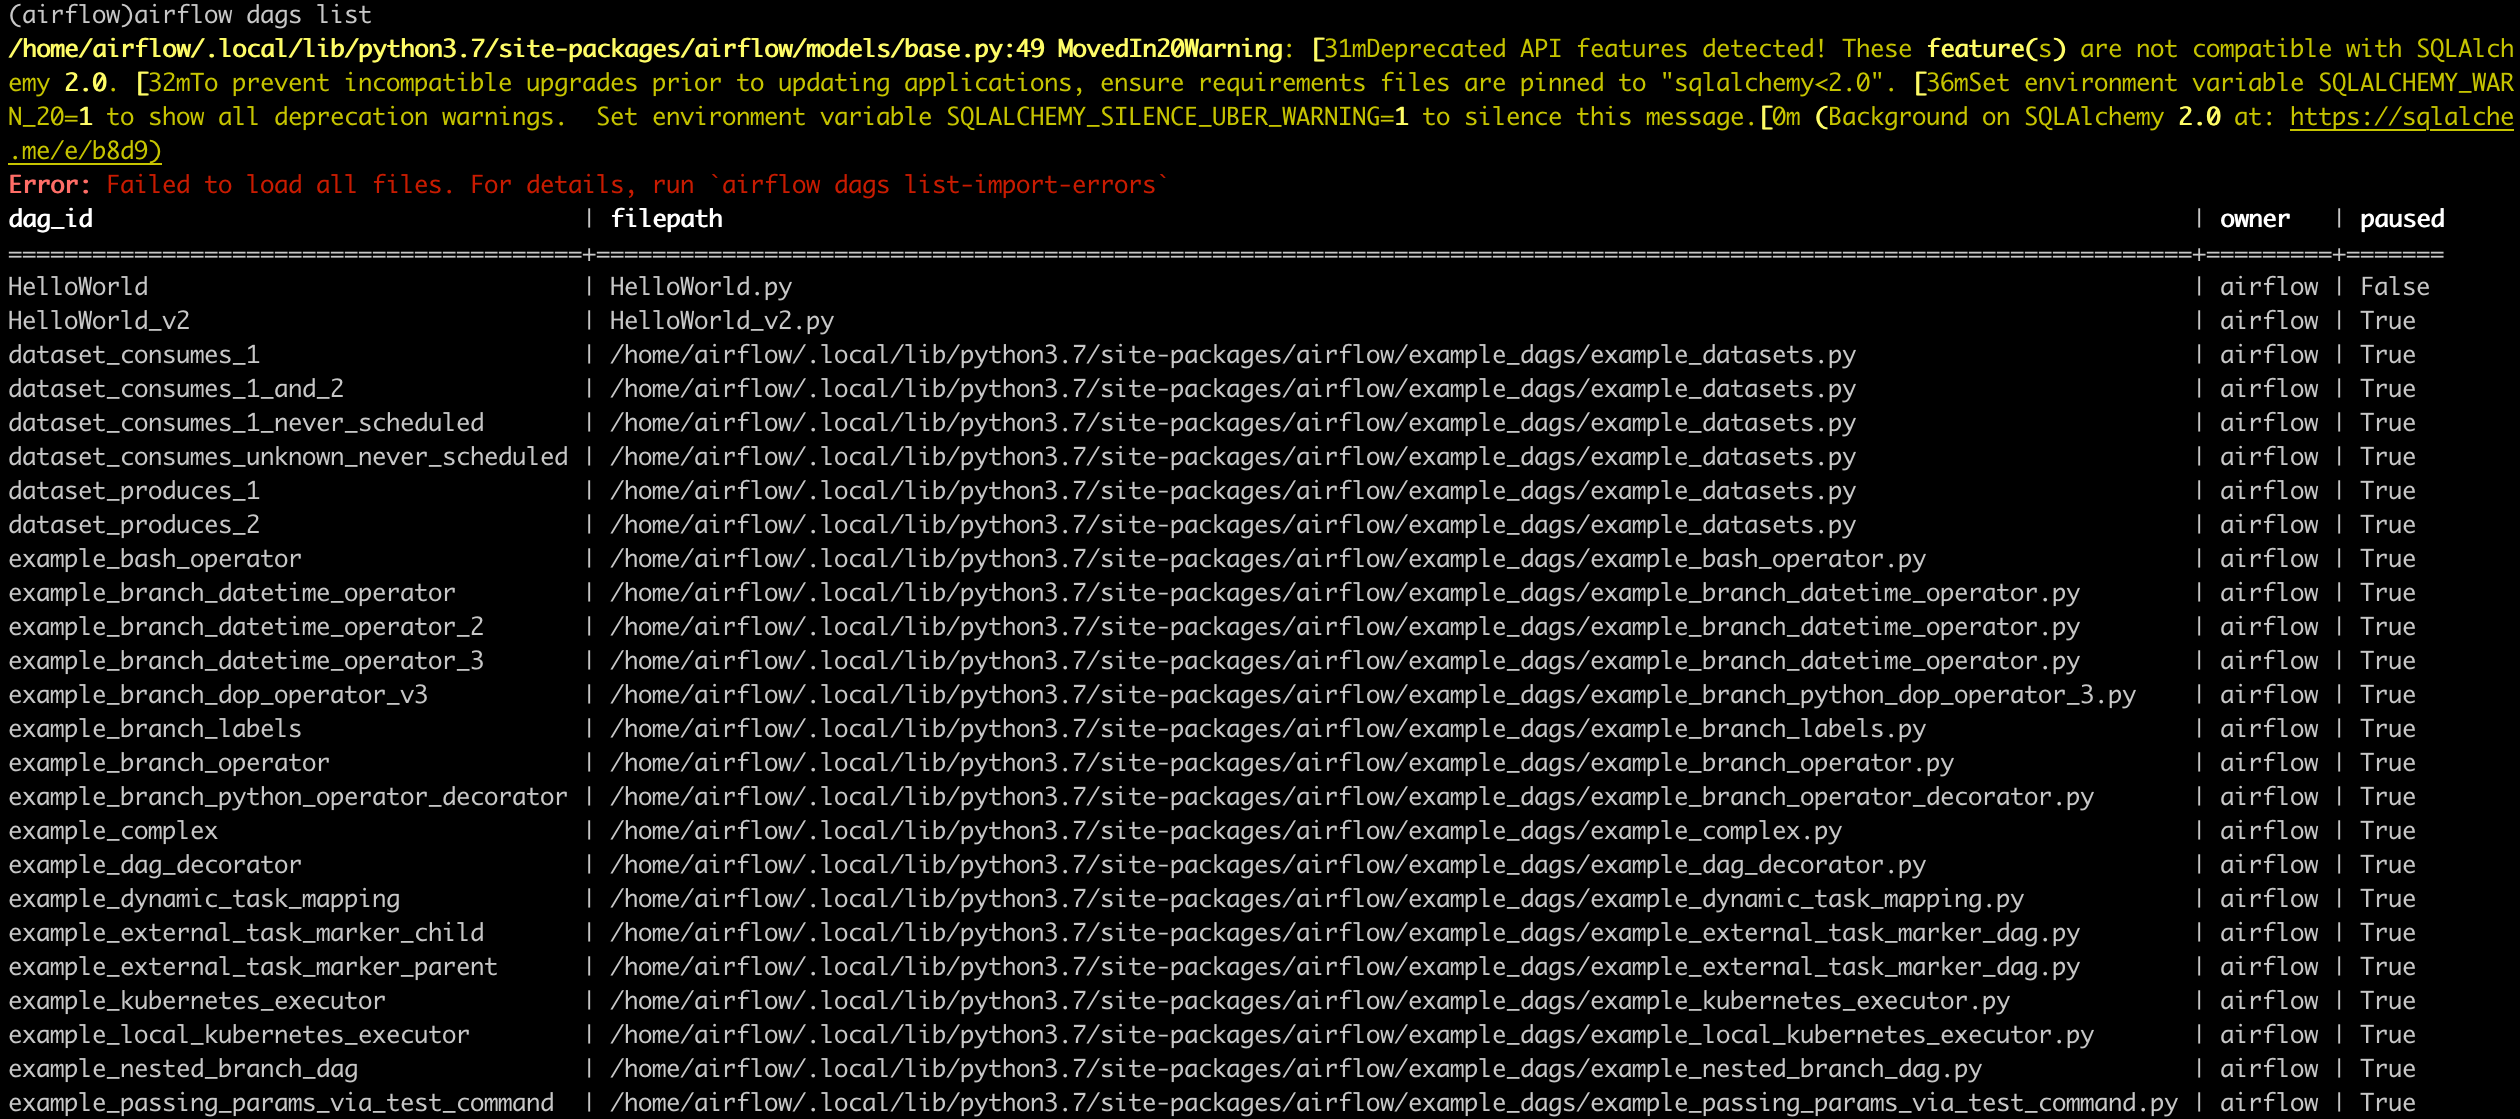
web ui 안거치고 cli 환경에서 DAG 리스트 확인하기
- airflow sh 들어가서 > airflow dags list 로 확인할 수 있다.
하나의 DAG를 골라서 그 밑에 어떤 task가 존재하고 실행시킬 수 있다. > airflow dags test [dag_id] (+execution_date)
task 하나만 실행할 수 있다. > airflow tasks test [dag_id] [task_id] [execution date(YYYY-mm-dd): not future]
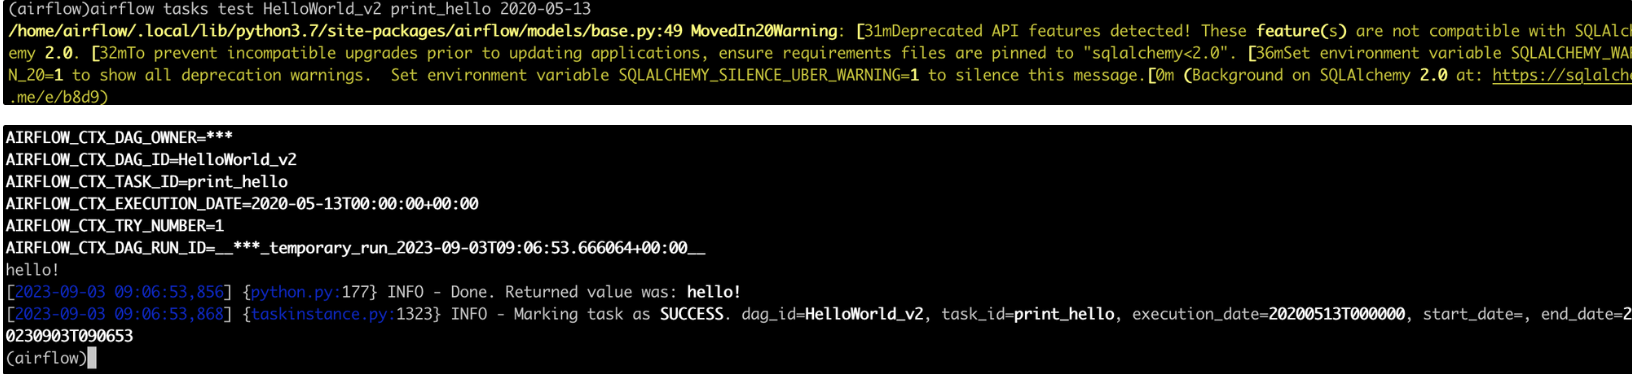
print_hello 했을때 hello 하나만 찍히고 끝나는것을 볼 수 있다.
- Airflow 의 전반적인 설정자체는 airflow.cfg (airflow configuration file)내부에 설정이 되어있다.
- 내부에 airflow 에게 dag파일이 어디에있는지 알려주는 커맨드가 존재한다. ‘dags_folder’ 내용
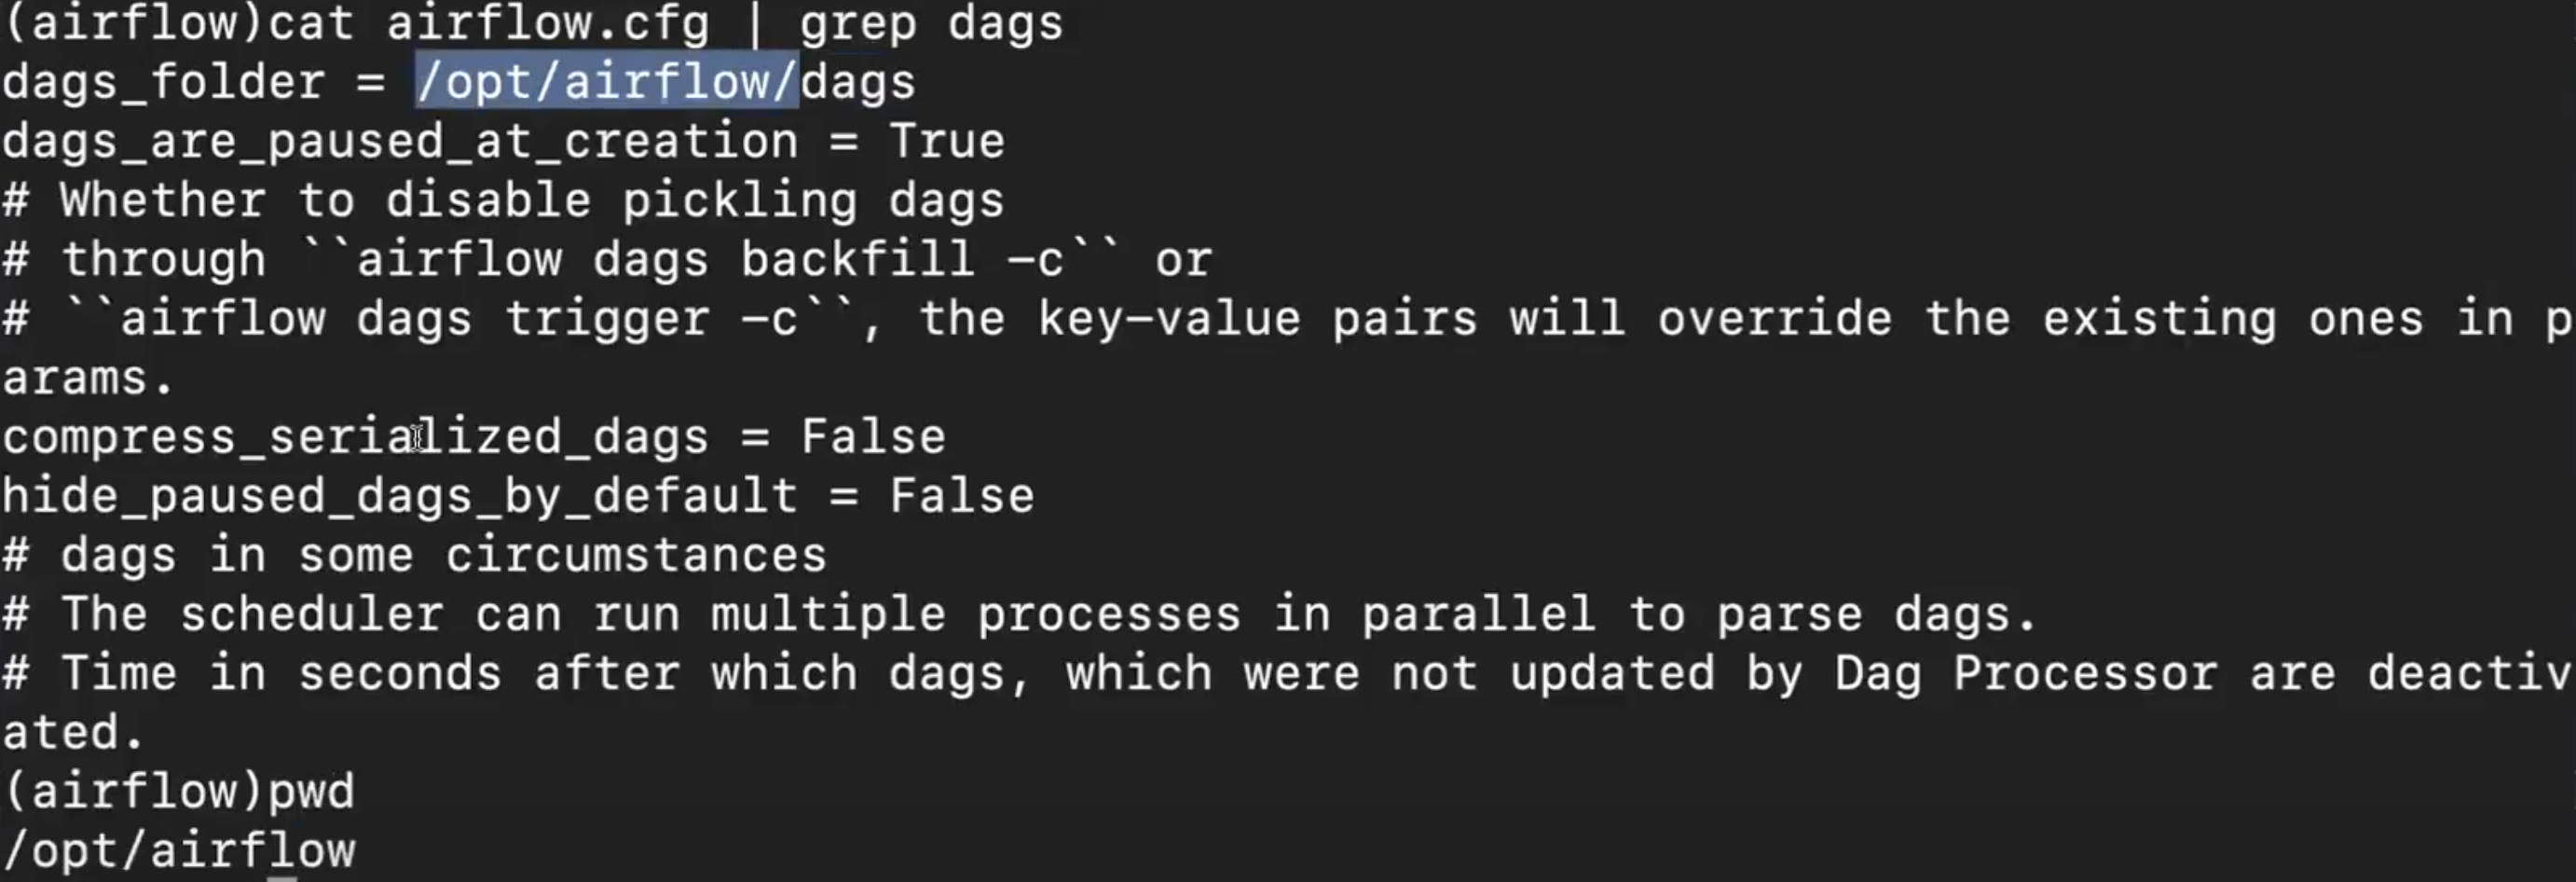
docker-compose 파일 내부에 volume이 지정되어있는 위치로 설정이 된다.
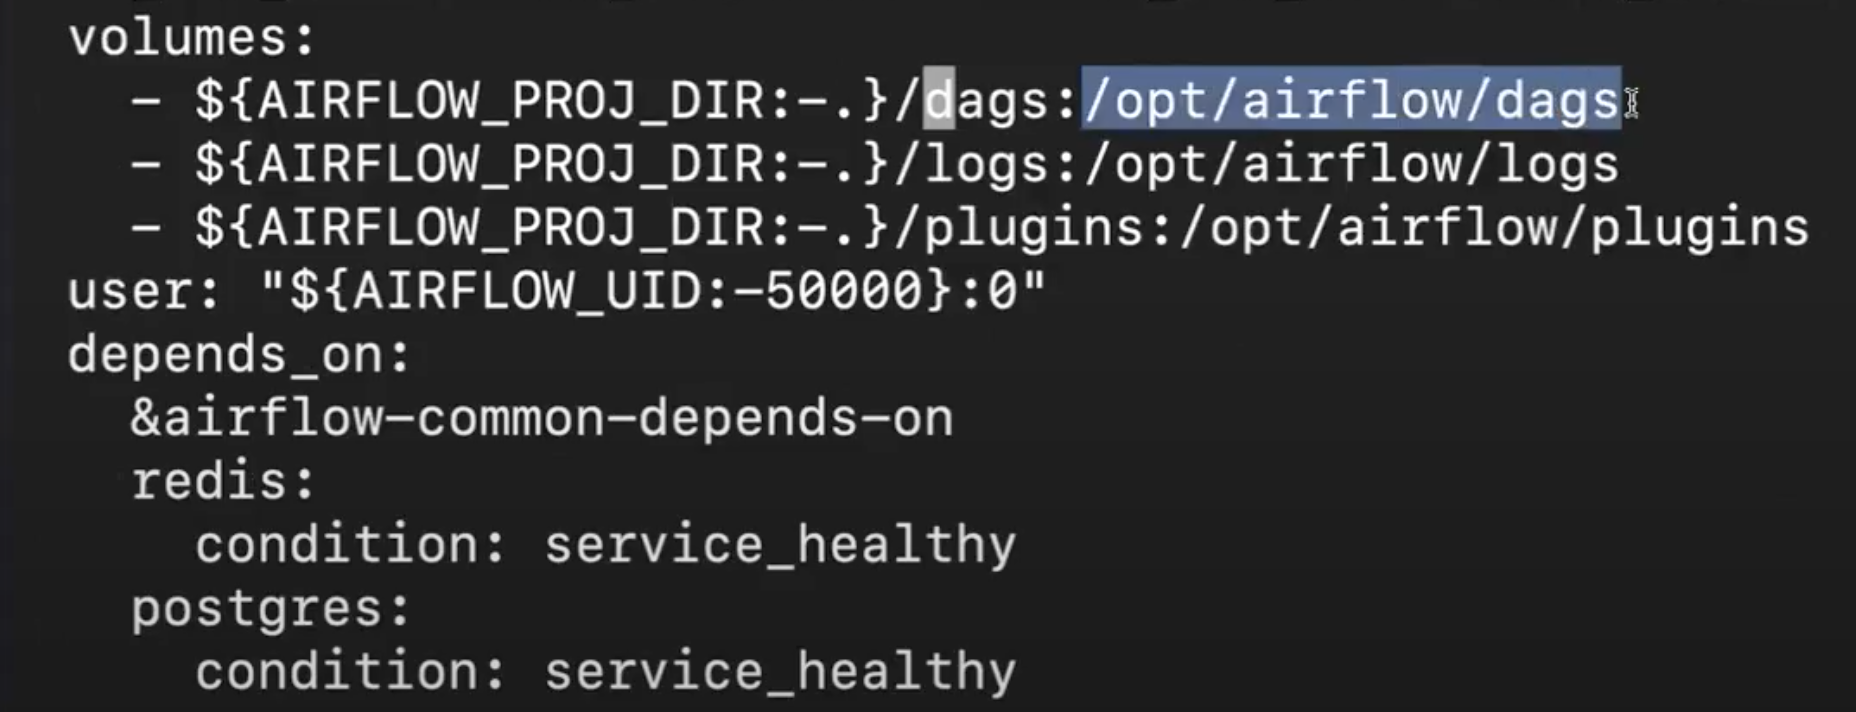
opt/airflow/dags 에 있는 정보와 동일하게 매핑시켜라 라는 뜻으로 이해할 수 있다.
Name Gender DAG 개선하기
NameGender_V1 (Porting to Airflow)
from airflow import DAG
from airflow.operators.python import PythonOperator
from datetime import datetime
import requests
import logging
import psycopg2

def get_Redshift_connection():
    host = HOST
    user = ID
    password = PW
    port = 5439
    dbname = "dev"
    conn = psycopg2.connect(f"dbname={dbname} user={user} host={host} password={password} port={port}")
    conn.set_session(autocommit=True)
    return conn.cursor()


def extract(url):
    logging.info("Extract started")
    f = requests.get(url)
    logging.info("Extract done")
    return (f.text)


def transform(text):
    logging.info("Transform started")
    lines = text.strip().split("\n")[1:] # 첫 번째 라인을 제외하고 처리
    records = []
    for l in lines:
      (name, gender) = l.split(",") # l = "MyName,M" -> [ 'MyName', 'M' ]
      records.append([name, gender])
    logging.info("Transform ended")
    return records


def load(records):
    logging.info("load started")
    """
    records = [
      [ "MyName", "M" ],
      [ "Claire", "F" ],
      ...
    ]
    """
    schema = "MyName"
    # BEGIN과 END를 사용해서 SQL 결과를 트랜잭션으로 만들어주는 것이 좋음
    cur = get_Redshift_connection()
    try:
        cur.execute("BEGIN;")
        cur.execute(f"DELETE FROM {schema}.name_gender;")
        # DELETE FROM을 먼저 수행 -> FULL REFRESH을 하는 형태
        for r in records:
            name = r[0]
            gender = r[1]
            print(name, "-", gender)
            sql = f"INSERT INTO {schema}.name_gender VALUES ('{name}', '{gender}')"
            cur.execute(sql)
        cur.execute("COMMIT;")   # cur.execute("END;")
    except (Exception, psycopg2.DatabaseError) as error:
        print(error)
        cur.execute("ROLLBACK;")
        raise
    logging.info("load done")


def etl():
    link = "s3link.csv"
    data = extract(link)
    lines = transform(data)
    load(lines)


dag_second_assignment = DAG(
	dag_id = 'name_gender',
	catchup = False,
	start_date = datetime(2023,4,6), # 날짜가 미래인 경우 실행이 안됨
	schedule = '0 2 * * *')  # 적당히 조절

task = PythonOperator(
	task_id = 'perform_etl',
	python_callable = etl,
	dag = dag_second_assignment)
이전에 작성했던 NameGender DAG를 Airflow로 Porting 하는 작업을 코드로 작성했다.
상당수의 코드가 하드코딩 되어 개선의 여지가 있어보인다.
NameGender_V2 (params, execution_date 활용하기)
task = PythonOperator(
    task_id = 'perform_etl',
    python_callable = etl,
    params = {
        'url': "s3link.csv"
    },
dag = dag)- V2에서는, csv 링크를 하드코딩 하지않고 PythonOperator의 params를 통해 변수를 넘길 수 있다.
def etl(**context):
    link = context["params"]["url"]
    # task 자체에 대한 정보 (일부는 DAG의 정보가 되기도 함)를 읽고 싶다면 context['task_instance'] 혹은 context['ti']를 통해 가능
    # https://airflow.readthedocs.io/en/latest/_api/airflow/models/taskinstance/index.html#airflow.models.TaskInstance
    task_instance = context['task_instance']
    execution_date = context['execution_date']

    logging.info(execution_date)

    data = extract(link)
    lines = transform(data)
load(lines)- Airflow가 유지하는 중요한 변수가 있는데 그중 execution_date를 받아서 찍어볼 수 있다.
- execution_date가 무엇이냐 → 위에서 이야기한 dag를 실행할 때 마지막 인자로 들어가는 부분이다.
> airflow dags test name_gender [execution_date]
NameGender_V3 (Variable, Xcom_(pull/push) 활용하기)
- Xcom(inter communication)을 통해 task간 데이터를 주고 받는다.
- xcom_push : Airflow 메타데이터 내부에 넣기
- xcom_pull : 메타데이터로 저장하고 있는 값을 다른 task에 던지기
def transform(**context):
    logging.info("Transform started")
    text = context["task_instance"].xcom_pull(key="return_value", task_ids="extract")
    lines = text.strip().split("\\n")[1:]
    for l in lines:
      (name, gender) = l.split(",")
      records.append([name, gender])
    logging.info("Transform ended")
    return records
- text = context["task_instance"].xcom_pull(key="return_value", task_ids="extract")
: extract 라는 task가 리턴해준 값을 읽어달라고 하는 명령어
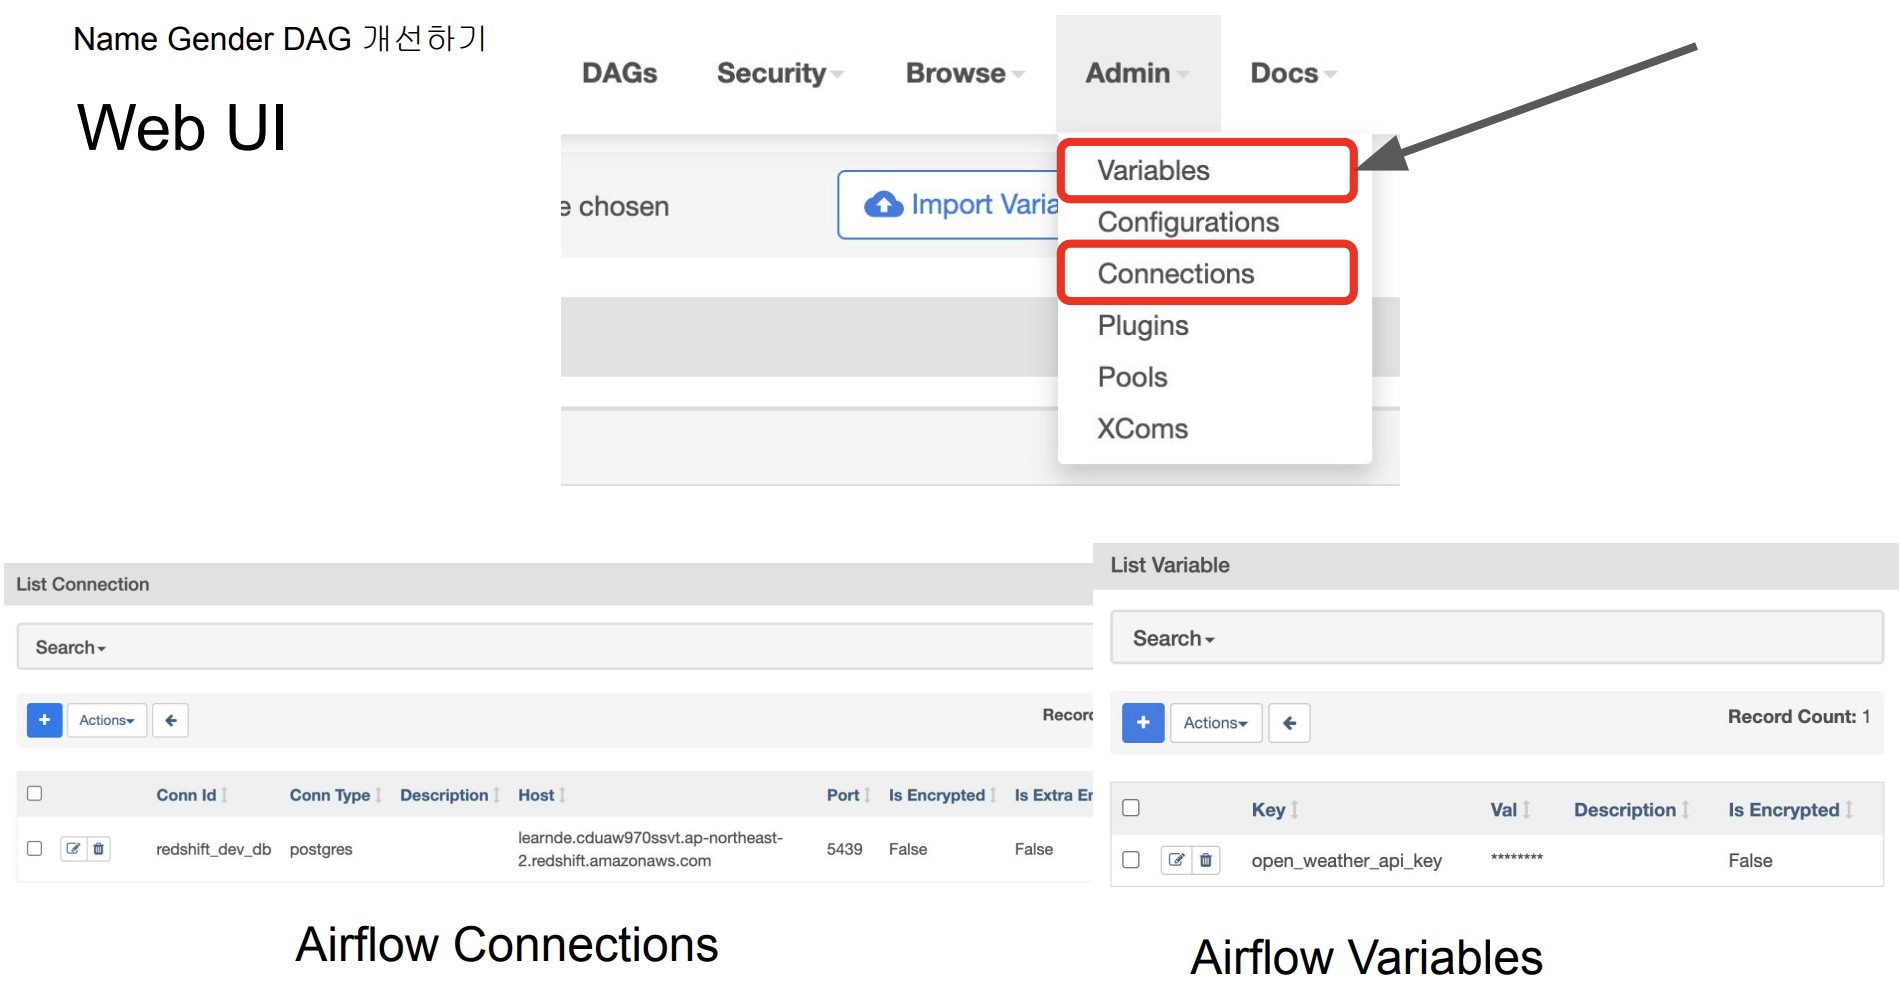
- Variable 으로 원하는 값을 import 해서 저장할 수 있음
- 또한, Redshift의 ID/PW등의 민감한 정보는, Airflow 코드에 남기지 않고, Connection에 따로 저장해서 접근하면 된다.
- PostgresHook 으로 redshift_dev_db을 가지고온다. 이는. 보안적인 이슈를 줄일 수 있다.
Yahoo Finance API DAG 작성
Yahoo Finance API DAG 작성(1) - full refresh
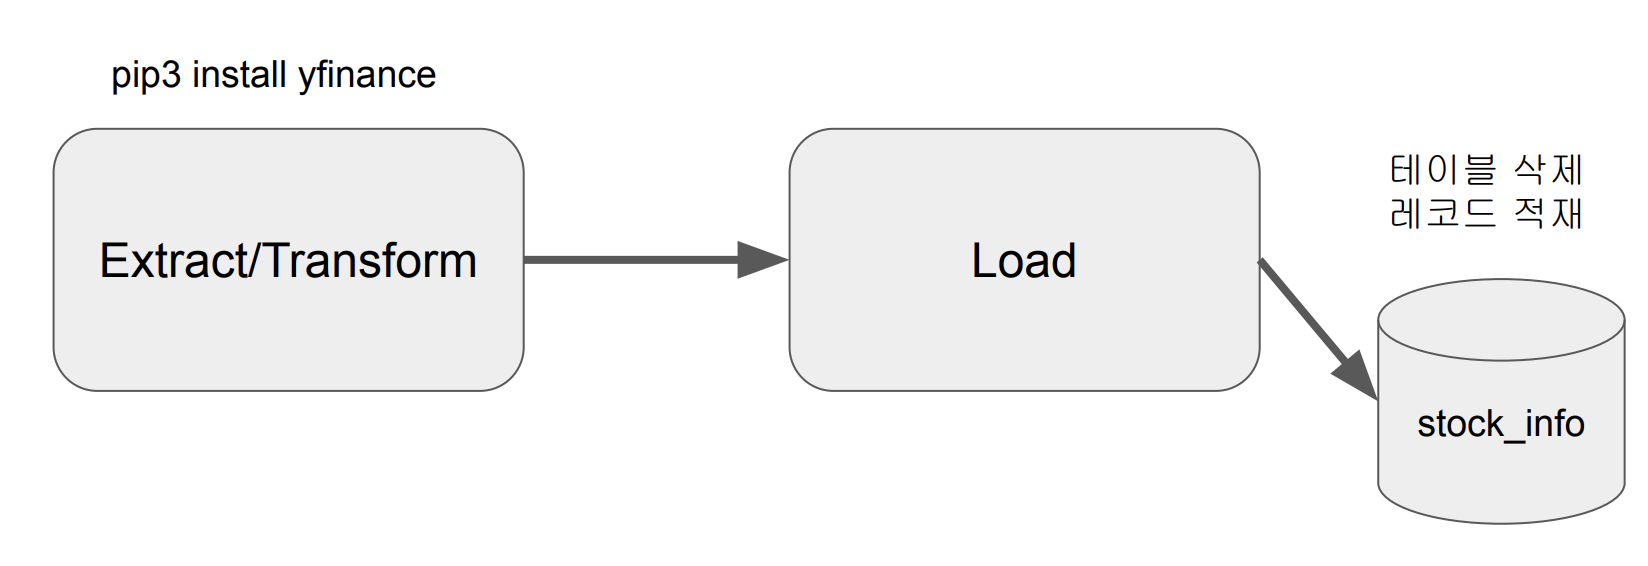
- Yahoo Finance API를 호출하여 애플 주식 정보 수집 (지난 30일)
- Redshift 상의 테이블로 1에서 받은 레코드들을 적재
3. Extract / Transform : Yahoo Finance API 호출
- API 호출하여 애플 주식(AAPL) 정보를 수집하고 파싱한다.
import yfinance as yf
@task
def get_historical_prices(symbol):
 ticket = yf.Ticker(symbol) # ticker = AAPL
 data = ticket.history()
 records = []
 for index, row in data.iterrows():
 date = index.strftime('%Y-%m-%d %H:%M:%S')
 records.append([date, row["Open"], row["High"], row["Low"], row["Close"], row["Volume"]])
 return records
- task decorator을 사용하게 된다면, 리턴값에 대한 처리를 아래와 같이 쓰면 Airflow가 대신 해준다.
results = get_historical_prices("AAPL")
load("MyName", "stock_info", results) # (스키마, @task이름, 로딩해야하는 레코드)- 결국 idea는 full-refresh 형태로 테이블 삭제하고 다시만드는 형태를 하나의 트랜잭션에다 묶는것이다.
❗️yfinance 모듈이 없다고 할때 → default python module이 아니기 때문에 기본으로 설치되어있지 않고 도커 컨테이너 돌때 사용해야 한다고 명시적으로 나타내주어야 한다.
Yahoo Finance API DAG 작성(2) - Incremental Update
- 새로 읽어온 것만 가져와서 읽는다 (not full refresh)
import yfinance as yf

@task
def get_historical_prices(symbol):
 ticket = yf.Ticker(symbol)
 data = ticket.history()
 records = []
 for index, row in data.iterrows():
 date = index.strftime('%Y-%m-%d %H:%M:%S')
 records.append([date, row["Open"], row["High"], row["Low"], row["Close"], row["Volume"]])
 return records
- 현재 테이블을 임시테이블로 가져오고, 임시테이블에다가 yfinance 로 읽은 데이터를 적재한다.
@task
def load(schema, table, records):
    logging.info("load started")
    cur = get_Redshift_connection()
    try:
        cur.execute("BEGIN;")
        # 원본 테이블이 없으면 생성 - 테이블이 처음 한번 만들어질 때 필요한 코드
        _create_table(cur, schema, table, False)
        # 임시 테이블로 원본 테이블을 복사
        cur.execute(f"CREATE TEMP TABLE t AS SELECT * FROM {schema}.{table};")
        for r in records:
            sql = f"INSERT INTO t VALUES ('{r[0]}', {r[1]}, {r[2]}, {r[3]}, {r[4]}, {r[5]});"
            print(sql)
            cur.execute(sql)

        # 원본 테이블 생성
        _create_table(cur, schema, table, True)
        # 임시 테이블 내용을 원본 테이블로 복사
        cur.execute(f"INSERT INTO {schema}.{table} SELECT DISTINCT * FROM t;")
        cur.execute("COMMIT;")   # cur.execute("END;")
    except Exception as error:
        print(error)
        cur.execute("ROLLBACK;")
        raise
    logging.info("load done")
- Incremental Update로 구현
- 임시 테이블 생성하면서 현재 테이블의 레코드를 복사 (CREATE TEMP TABLE … AS SELECT)
- 임시 테이블로 Yahoo Finance API로 읽어온 레코드를 적재
- 원본 테이블을 삭제하고 새로 생성
- 원본 테이블에 임시 테이블의 내용을 복사 (이 때 **SELECT DISTINCT ***를 사용하여 중복 제거)
- 트랜잭션 형태로 구성 (NameGender DAG와 동일)
4주차 후기
Airflow의 기능들을 많이 배워볼 수 있었던 시간이었다.
실제로 API 를 가지고와서 DAG설정해보는 과정을 해보면서 쓰임에 대해 더 깊이있게 배운것 같다.
Incremental Update의 과정이 머리 아프게하지만 반복숙달하면 괜찮을지도?